 Screenshot by Lance Whitney
Microsoft's Copilot Pro AI offers a few benefits for $20 per month. But the most helpful one is the AI-powered integration with the different Microsoft 365 apps. For those of you who use Microsoft Word, for instance, Copilot Pro can help you write and revise your text, provide summaries of your documents, and answer questions about any document.
First, you'll need a subscription to either Microsoft 365 Personal or Family . Priced at $70 per year, the Personal edition is geared for one individual signed into as many as five devices. At $100 per year, the Family edition is aimed at up to six people on as many as five devices. The core apps in the suite include Word, Excel, PowerPoint, Outlook, and OneNote.
Also: Microsoft Copilot vs. Copilot Pro: Is the subscription fee worth it?
Second, you'll need the subscription to Copilot Pro if you don't already have one. To sign up, head to the Copilot Pro website. Click the Get Copilot Pro button. Confirm the subscription and the payment. The next time you use Copilot on the website, in Windows, or with the mobile apps, the Pro version will be in effect.
How to use Copilot Pro in Word
1. Open Word
Launch Microsoft Word and open a blank document. Let's say you need help writing a particular type of document and want Copilot to create a draft.
Also: Microsoft Copilot Pro vs. OpenAI's ChatGPT Plus: Which is worth your $20 a month?
A small "Draft with Copilot" window appears on the screen. If you don't see it, click the tiny "Draft with Copilot icon in the left margin."
Open Word.
Screenshot by Lance Whitney2. Submit your request
At the text field in the window, type a description of the text you need and click the "Generate" button.
Submit your request.
Screenshot by Lance Whitney3. Review the response and your options
Copilot generates and displays its response. After reading the response, you're presented with a few different options.
Review the response and your options.
Screenshot by Lance Whitney4. Keep, regenerate, or remove the draft
If you like the draft, click "Keep it." The draft is then inserted into your document where you can work with it. If you don't like the draft, click the "Regenerate" button, and a new draft is created.
Also: What is Copilot (formerly Bing Chat)? Here's everything you need to know
If you'd prefer to throw out the entire draft and start from scratch, click the trash can icon.
Keep, regenerate, or remove the draft.
Screenshot by Lance Whitney5. Alter the draft
Alternatively, you can try to modify the draft by typing a specific request in the text field, such as "Make it more formal," "Make it shorter," or "Make it more casual."
Alter the draft.
Screenshot by Lance Whitney6. Review the different versions
If you opt to regenerate the draft, you can switch between the different versions by clicking the left or right arrow next to the number. You can then choose to keep the draft you prefer.
7. Revise existing text
Copilot will also help you fine-tune existing text. Select the text you want to revise. Click the Copilot icon in the left margin and select "Rewrite with Copilot."
Revise existing text.
Screenshot by Lance Whitney8. Review the different versions
Copilot creates a few different versions of the text. Click the arrow keys to view each version.
Review the different versions.
Screenshot by Lance Whitney9. Replace or Insert
If you find one you like, click "Replace" to replace the text you selected.
Also: ChatGPT vs. Microsoft Copilot vs. Gemini: Which is the best AI chatbot?
Click "Insert below" to insert the new draft below the existing words so you can compare the two.
Replace or Insert.
Screenshot by Lance Whitney10. Adjust the tone
Click "Regenerate" to ask Copilot to try again. Click the "Adjust Tone" button and select a different tone to generate another draft.
Adjust the tone.
Screenshot by Lance Whitney11. Turn text into a table
Sometimes you have text that would look and work better as a table. Copilot can help. Select the text you wish to turn into a table. Click the Copilot icon and select "Visualize as a Table."
Turn text into a table.
Screenshot by Lance Whitney12. Respond to the table
In response, click "Keep it" to retain the table. Click "Regenerate" to try again. Click the trash can icon to delete it. Otherwise, type a request in the text field, such as "remove the second row" or "make the last column wider."
Respond to the table.
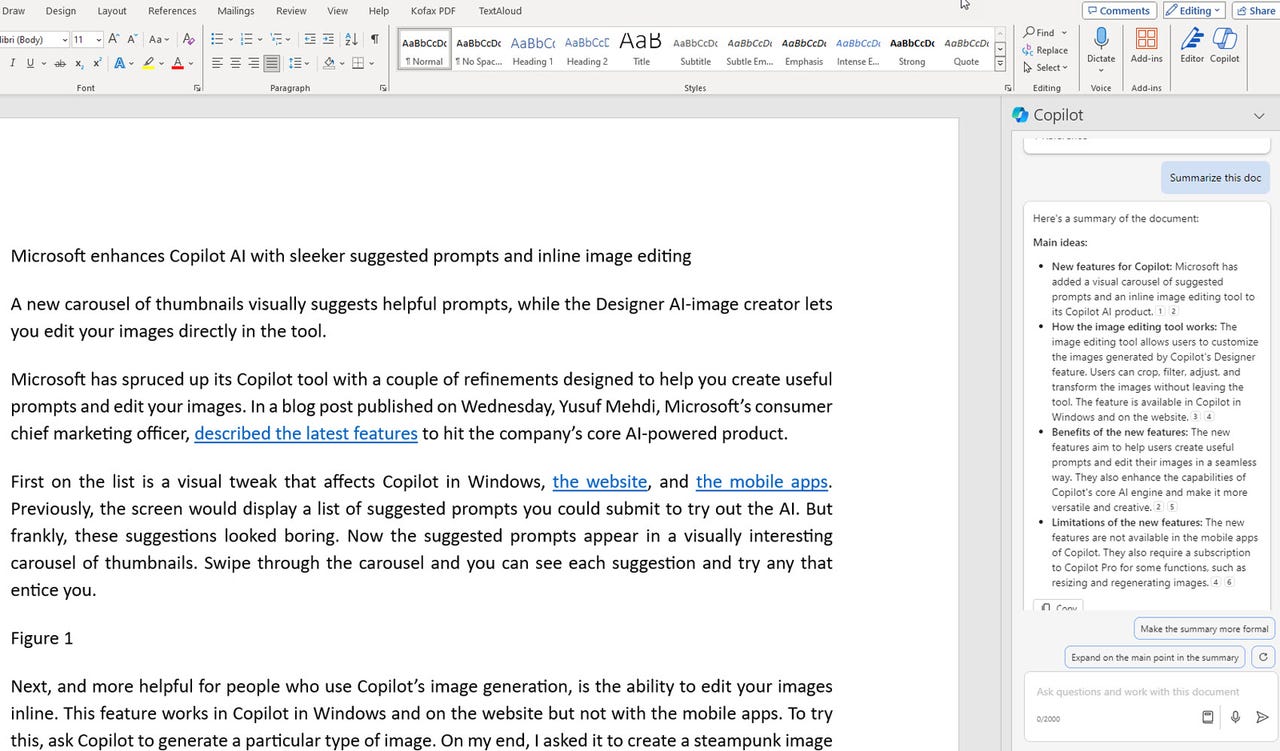
Screenshot by Lance Whitney13. Summarize a document
Copilot Pro can provide a summary of a document with its key points. To try this, open the document you want to summarize and then click the Copilot icon on the Ribbon.
Also: The best AI chatbots
The right sidebar displays several prompts you can use to start your question. Click the one for "Summarize this doc."
Summarize a document.
Screenshot by Lance Whitney14. Review the summary
View the generated summary in the sidebar. If you like it as is, click the "Copy" button to copy the summary and paste it elsewhere.
Review the summary.
Screenshot by Lance Whitney15. Revise the summary
Otherwise, choose one of the suggested questions or ask your own question to revise the summary. For example, you could tell Copilot to make the summary longer, shorter, more formal, or less formal.
Also: The best AI image generators
You could also ask it to expand on one of the points in the summary or provide more details on a certain point. A specific response is then generated based on your request.
Revise the summary.
Screenshot by Lance Whitney16. Ask questions about a document
Next, you can ask specific questions about any of the content in a document. Again, click the Copilot icon to display the sidebar. In the prompt area, type and submit your question. Copilot displays the response in the sidebar. You can then ask follow-up questions as needed.
Ask questions about a document.
Screenshot by Lance WhitneyMore how-tos
-
How to watch Apple spatial videos on the Meta Quest 3? It's complicated
-
How to simplify your Final Cut Pro workflow with saved effect presets
-
How to move from 'iTunes for Windows' to Apple's new media apps without losing content
-
How to use ImageFX, Google's new AI image generator